> ## Documentation Index
> Fetch the complete documentation index at: https://docs.siflow.cn/llms.txt
> Use this file to discover all available pages before exploring further.
# JupyterLab
点击左侧边栏 开发环境 菜单下的 JupyterLab,进入 JupyterLab 概览页面。
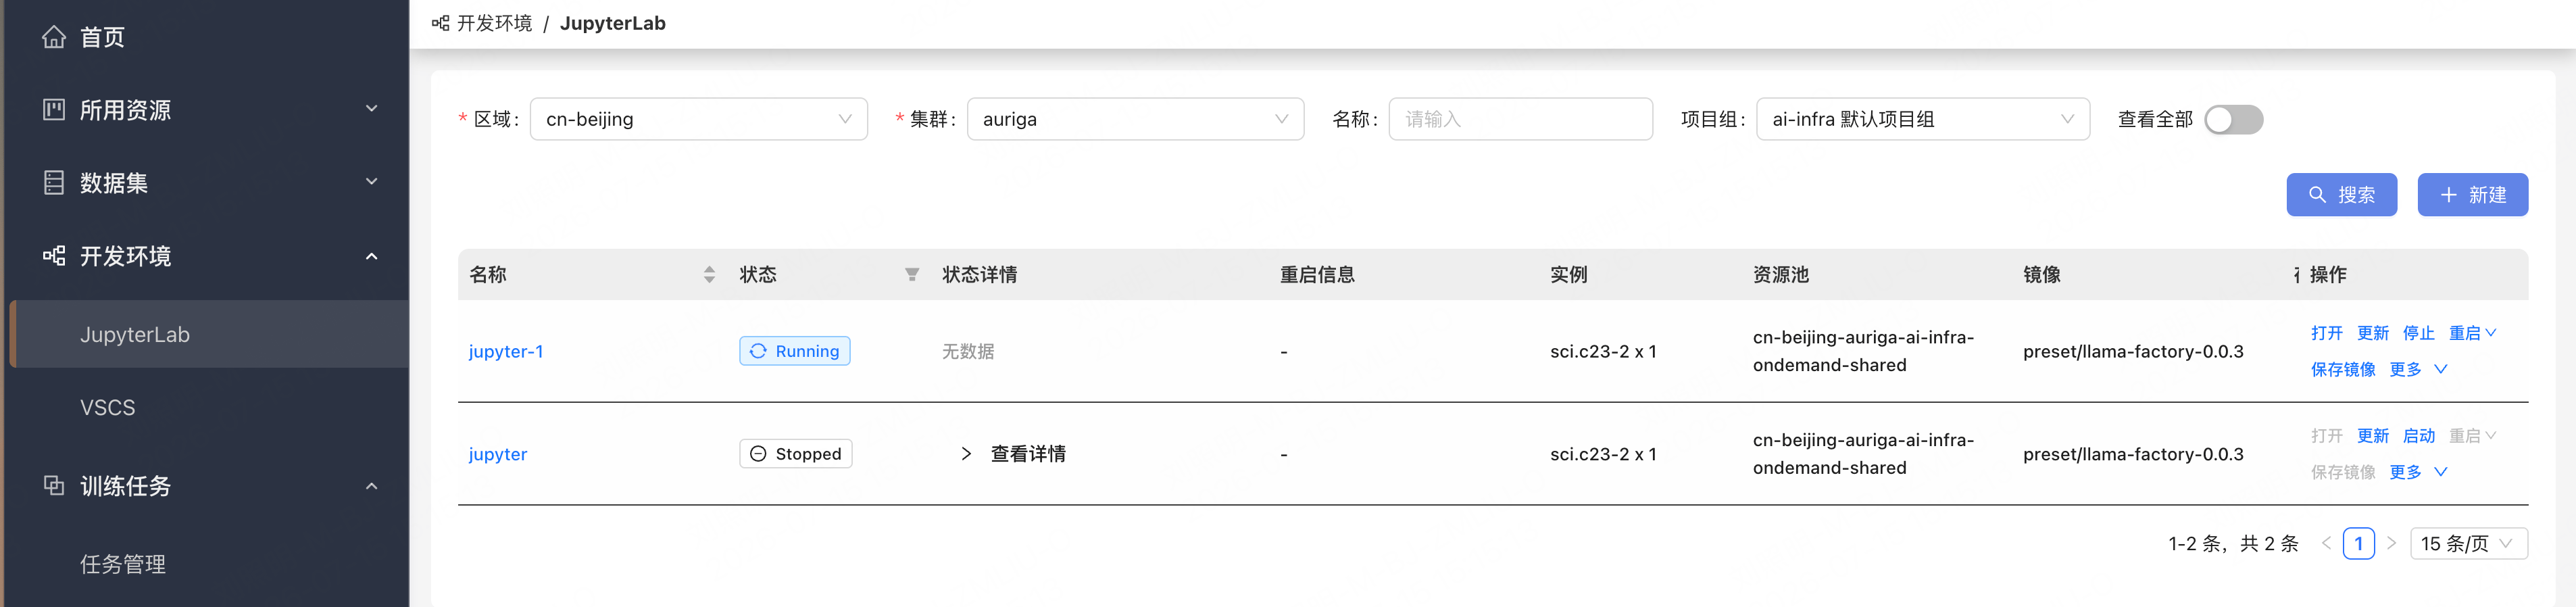 该页面展示了用户创建的所有 Jupyter notebook 的汇总信息。每个 Jupyter notebook 占一行,包含:集群、名称、实例、存储卷、镜像、创建时间、更新时间、状态、状态详情
* 集群:每个 Jupyter 必须在某个地域的集群内创建(必填)
* 名称:创建 Jupyter notebook 时的名称(必填)
* 实例:运行 Jupyter notebook 所需的设备类型和数量(必填)
* 存储卷:Jupyter notebook 使用的存储卷和挂载目录(可选)
* 镜像:Jupyter notebook 使用的镜像(必填)
* 创建时间:Jupyter notebook 的创建时间(仅显示)
* 更新时间:当前状态的更新时间(仅显示)
* 状态:Jupyter notebook 的当前状态(仅显示)
* 状态详情:Jupyter notebook 当前状态的描述(仅显示)
* 操作:打开、更新、停止/启动、重启、保存镜像,以及“更多”菜单中的定时开关、克隆、自动缩容、公开到项目组、删除
## 新建
点击右上角的“新建”按钮,进入创建页面。
该页面展示了用户创建的所有 Jupyter notebook 的汇总信息。每个 Jupyter notebook 占一行,包含:集群、名称、实例、存储卷、镜像、创建时间、更新时间、状态、状态详情
* 集群:每个 Jupyter 必须在某个地域的集群内创建(必填)
* 名称:创建 Jupyter notebook 时的名称(必填)
* 实例:运行 Jupyter notebook 所需的设备类型和数量(必填)
* 存储卷:Jupyter notebook 使用的存储卷和挂载目录(可选)
* 镜像:Jupyter notebook 使用的镜像(必填)
* 创建时间:Jupyter notebook 的创建时间(仅显示)
* 更新时间:当前状态的更新时间(仅显示)
* 状态:Jupyter notebook 的当前状态(仅显示)
* 状态详情:Jupyter notebook 当前状态的描述(仅显示)
* 操作:打开、更新、停止/启动、重启、保存镜像,以及“更多”菜单中的定时开关、克隆、自动缩容、公开到项目组、删除
## 新建
点击右上角的“新建”按钮,进入创建页面。
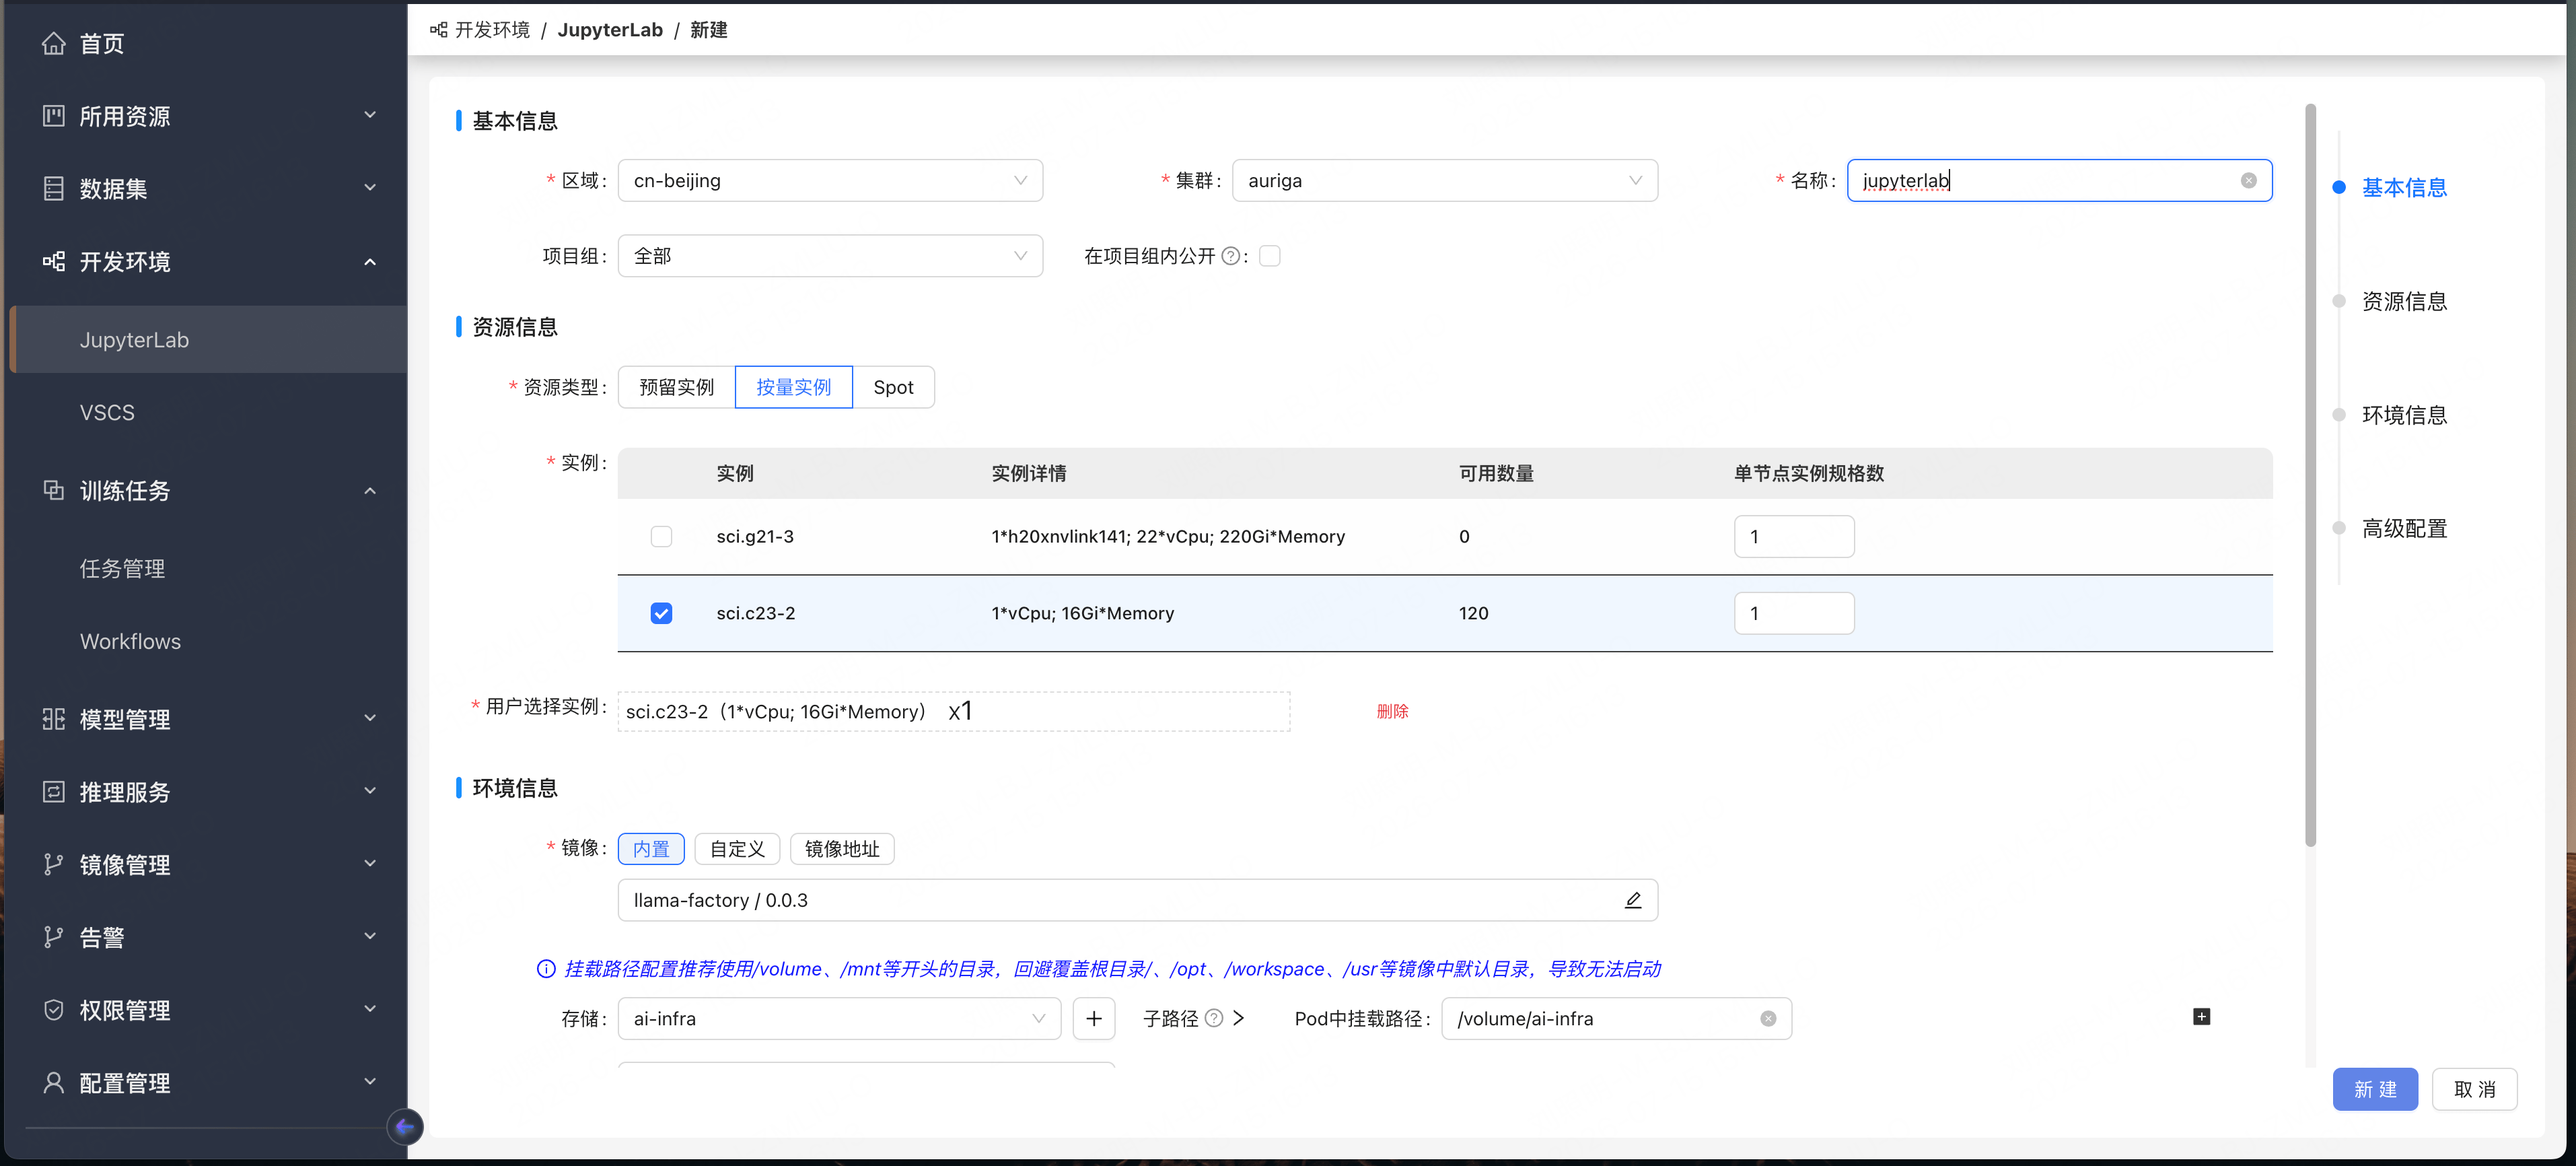 请注意,存储卷和挂载目录是可选的,因为即使不挂载存储卷,Jupyter 仍然可以使用少量存储空间运行。
* 存储卷和挂载目录成对出现:要么都留空,要么都填写。
* 存储卷和挂载目录可以有多组;点击右侧的加号可以再添加一组。
根目录和命令是可选信息。根目录表示 Jupyter 启动时的根目录,对应在 Jupyter 中点击“打开”按钮后目录栏的内容。命令表示启动 Jupyter 之前要执行的命令(该命令必须有效,否则 Jupyter 启动命令将不会执行)。建议将根目录设置在已挂载的持久化存储卷目录下,否则实例重启或关闭后该目录中的文件会丢失。
请注意,存储卷和挂载目录是可选的,因为即使不挂载存储卷,Jupyter 仍然可以使用少量存储空间运行。
* 存储卷和挂载目录成对出现:要么都留空,要么都填写。
* 存储卷和挂载目录可以有多组;点击右侧的加号可以再添加一组。
根目录和命令是可选信息。根目录表示 Jupyter 启动时的根目录,对应在 Jupyter 中点击“打开”按钮后目录栏的内容。命令表示启动 Jupyter 之前要执行的命令(该命令必须有效,否则 Jupyter 启动命令将不会执行)。建议将根目录设置在已挂载的持久化存储卷目录下,否则实例重启或关闭后该目录中的文件会丢失。
 ## 列表操作
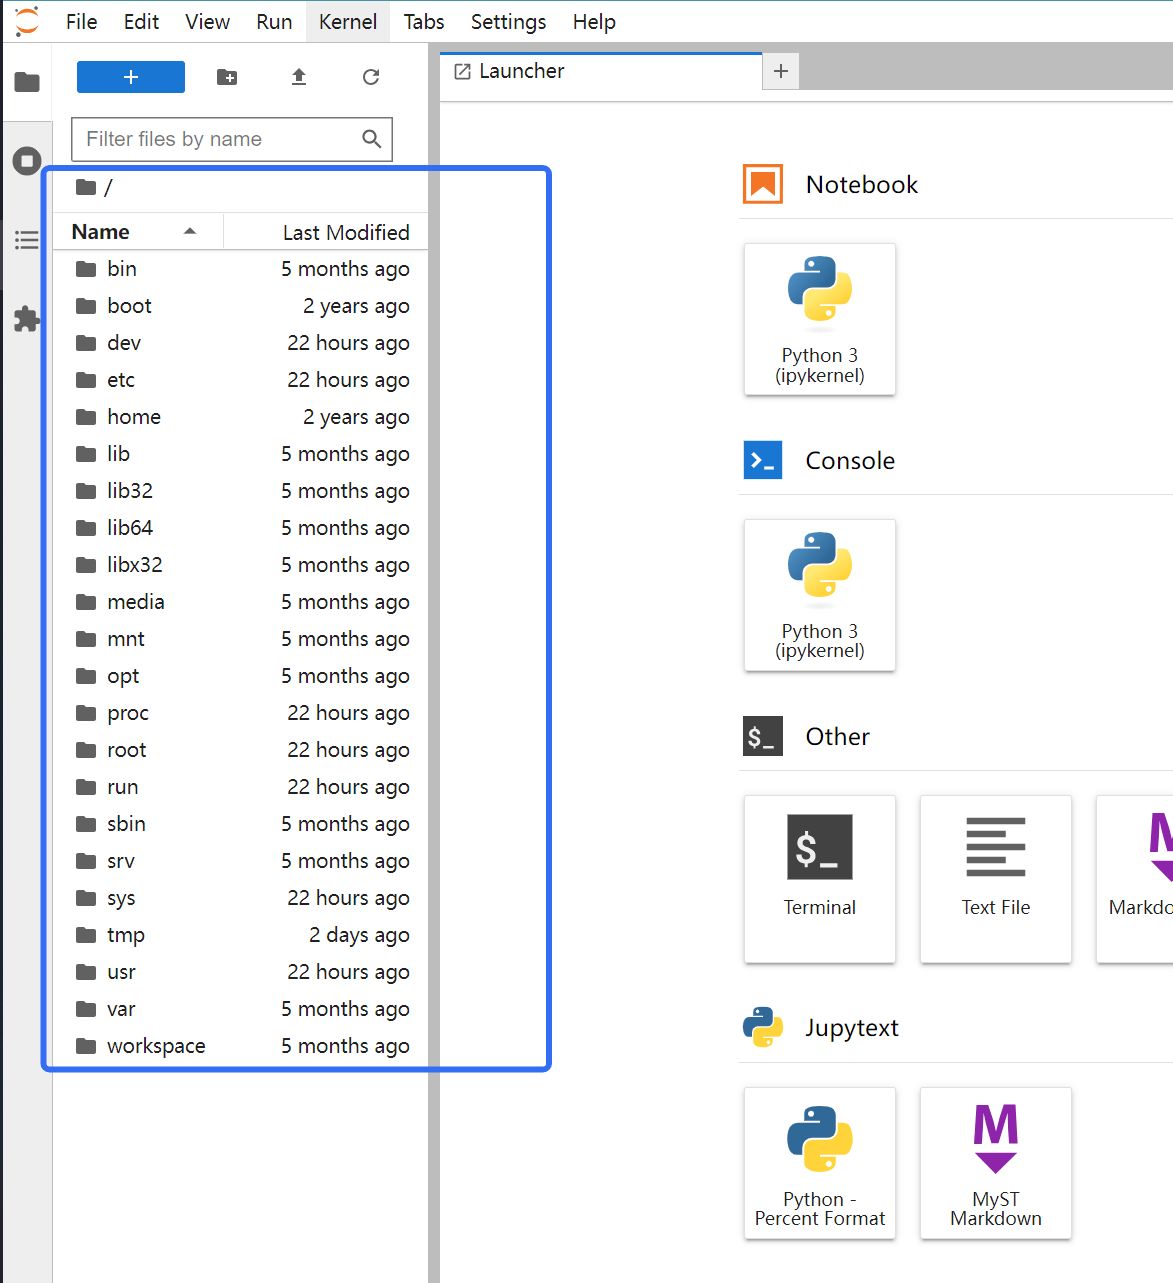
1. 打开:打开 Jupyter 页面开始使用,如上图所示
2. 详情:查看 Jupyter 的详细信息,与新建/更新中输入的信息一致
## 列表操作
1. 打开:打开 Jupyter 页面开始使用,如上图所示
2. 详情:查看 Jupyter 的详细信息,与新建/更新中输入的信息一致
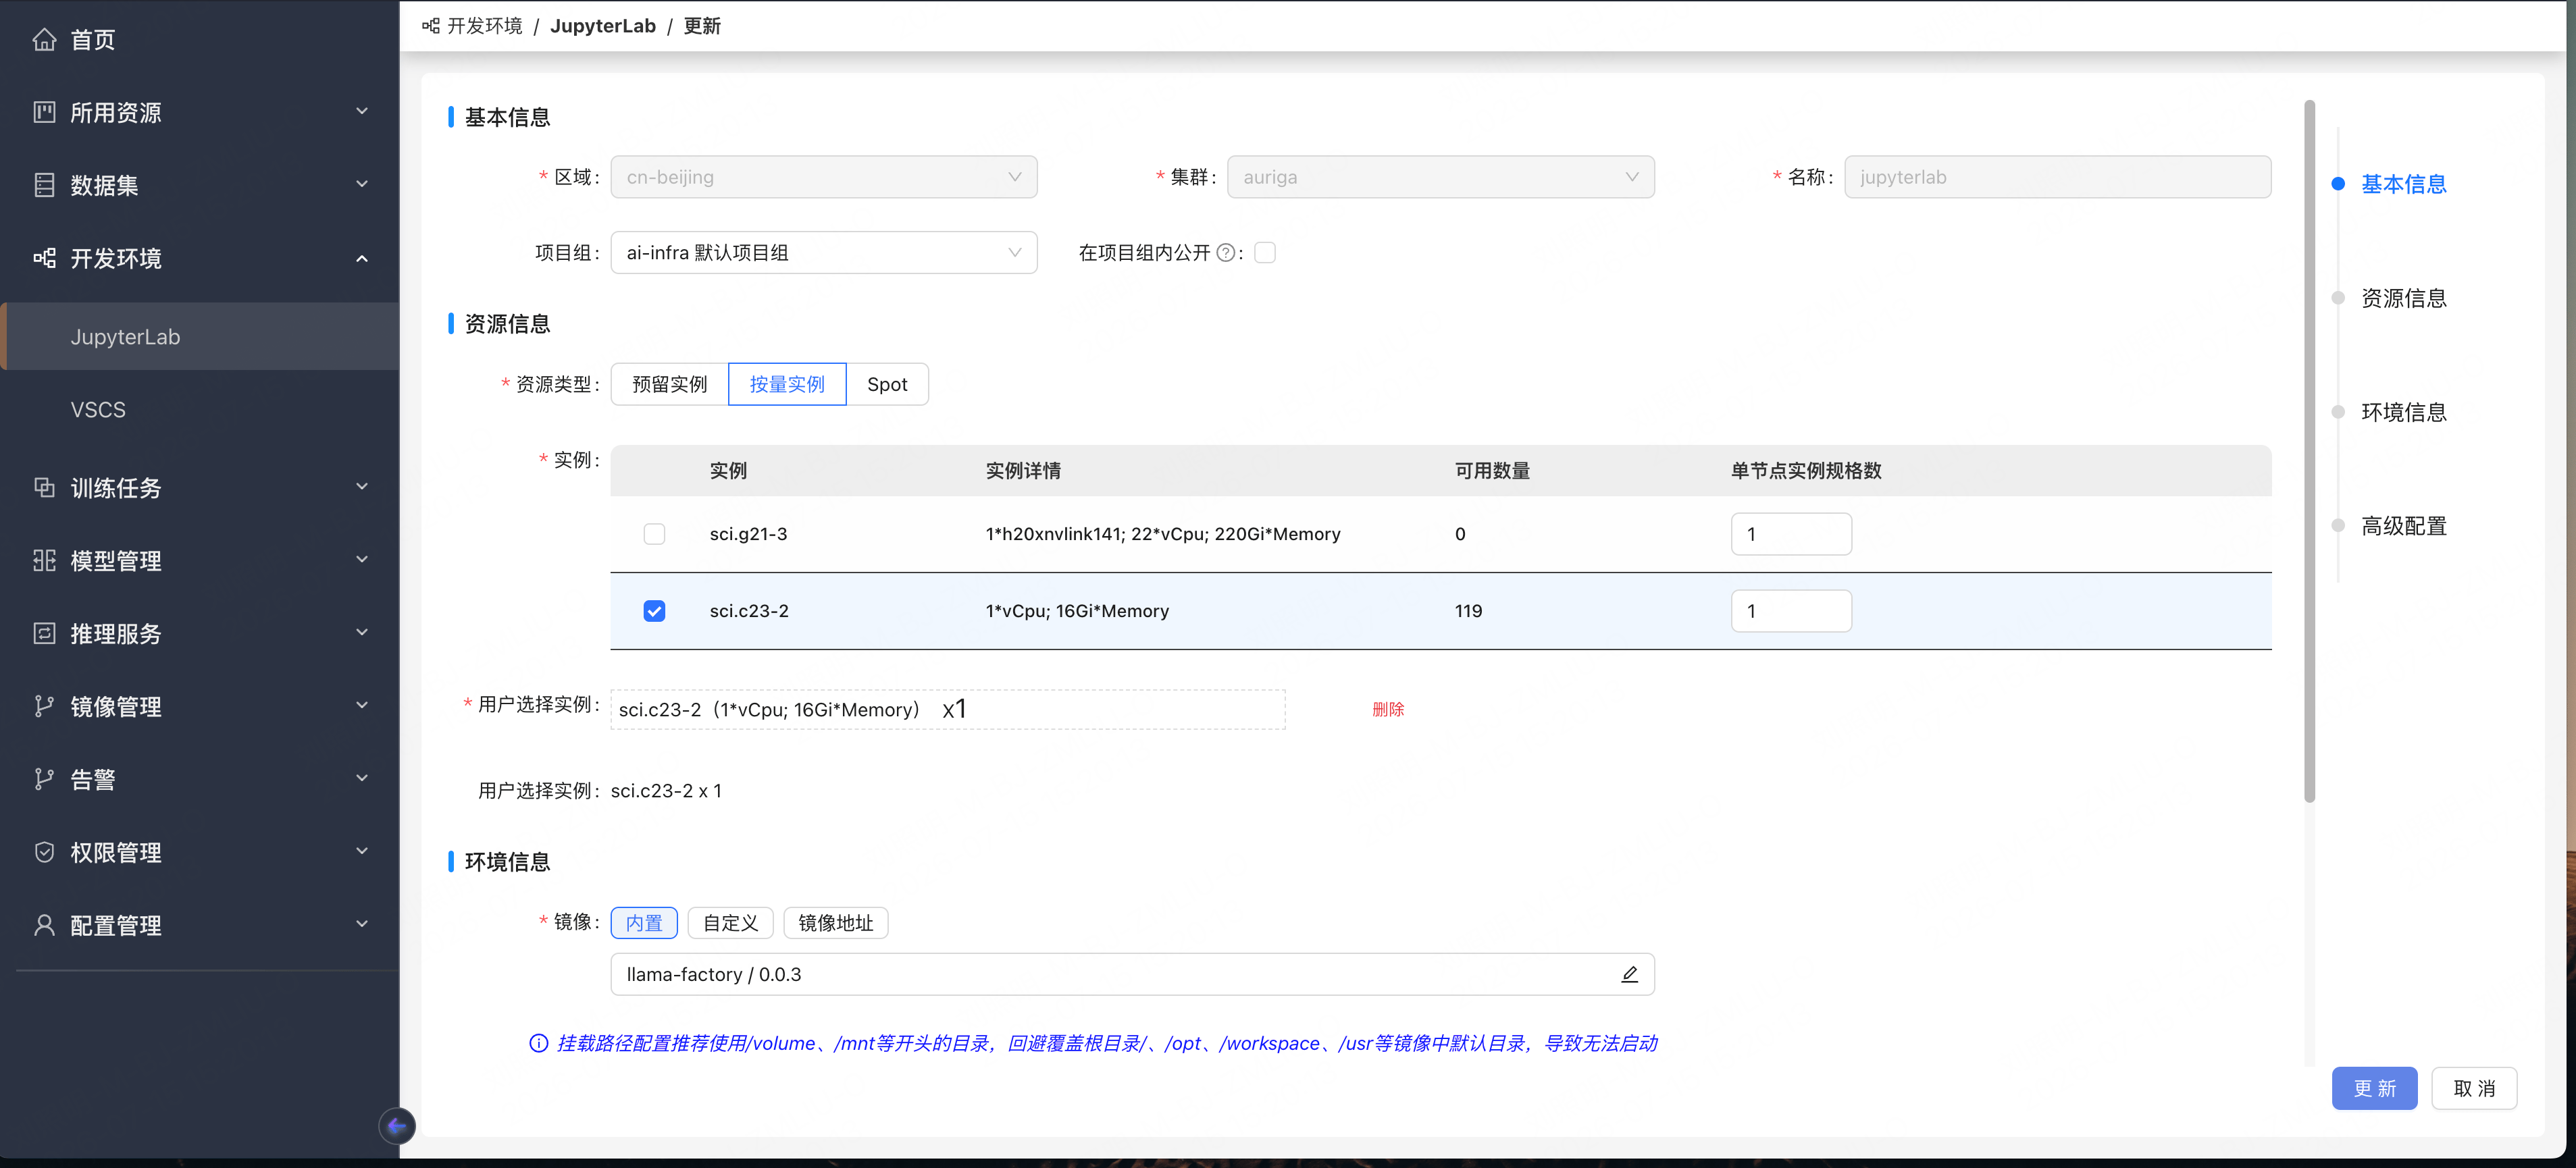
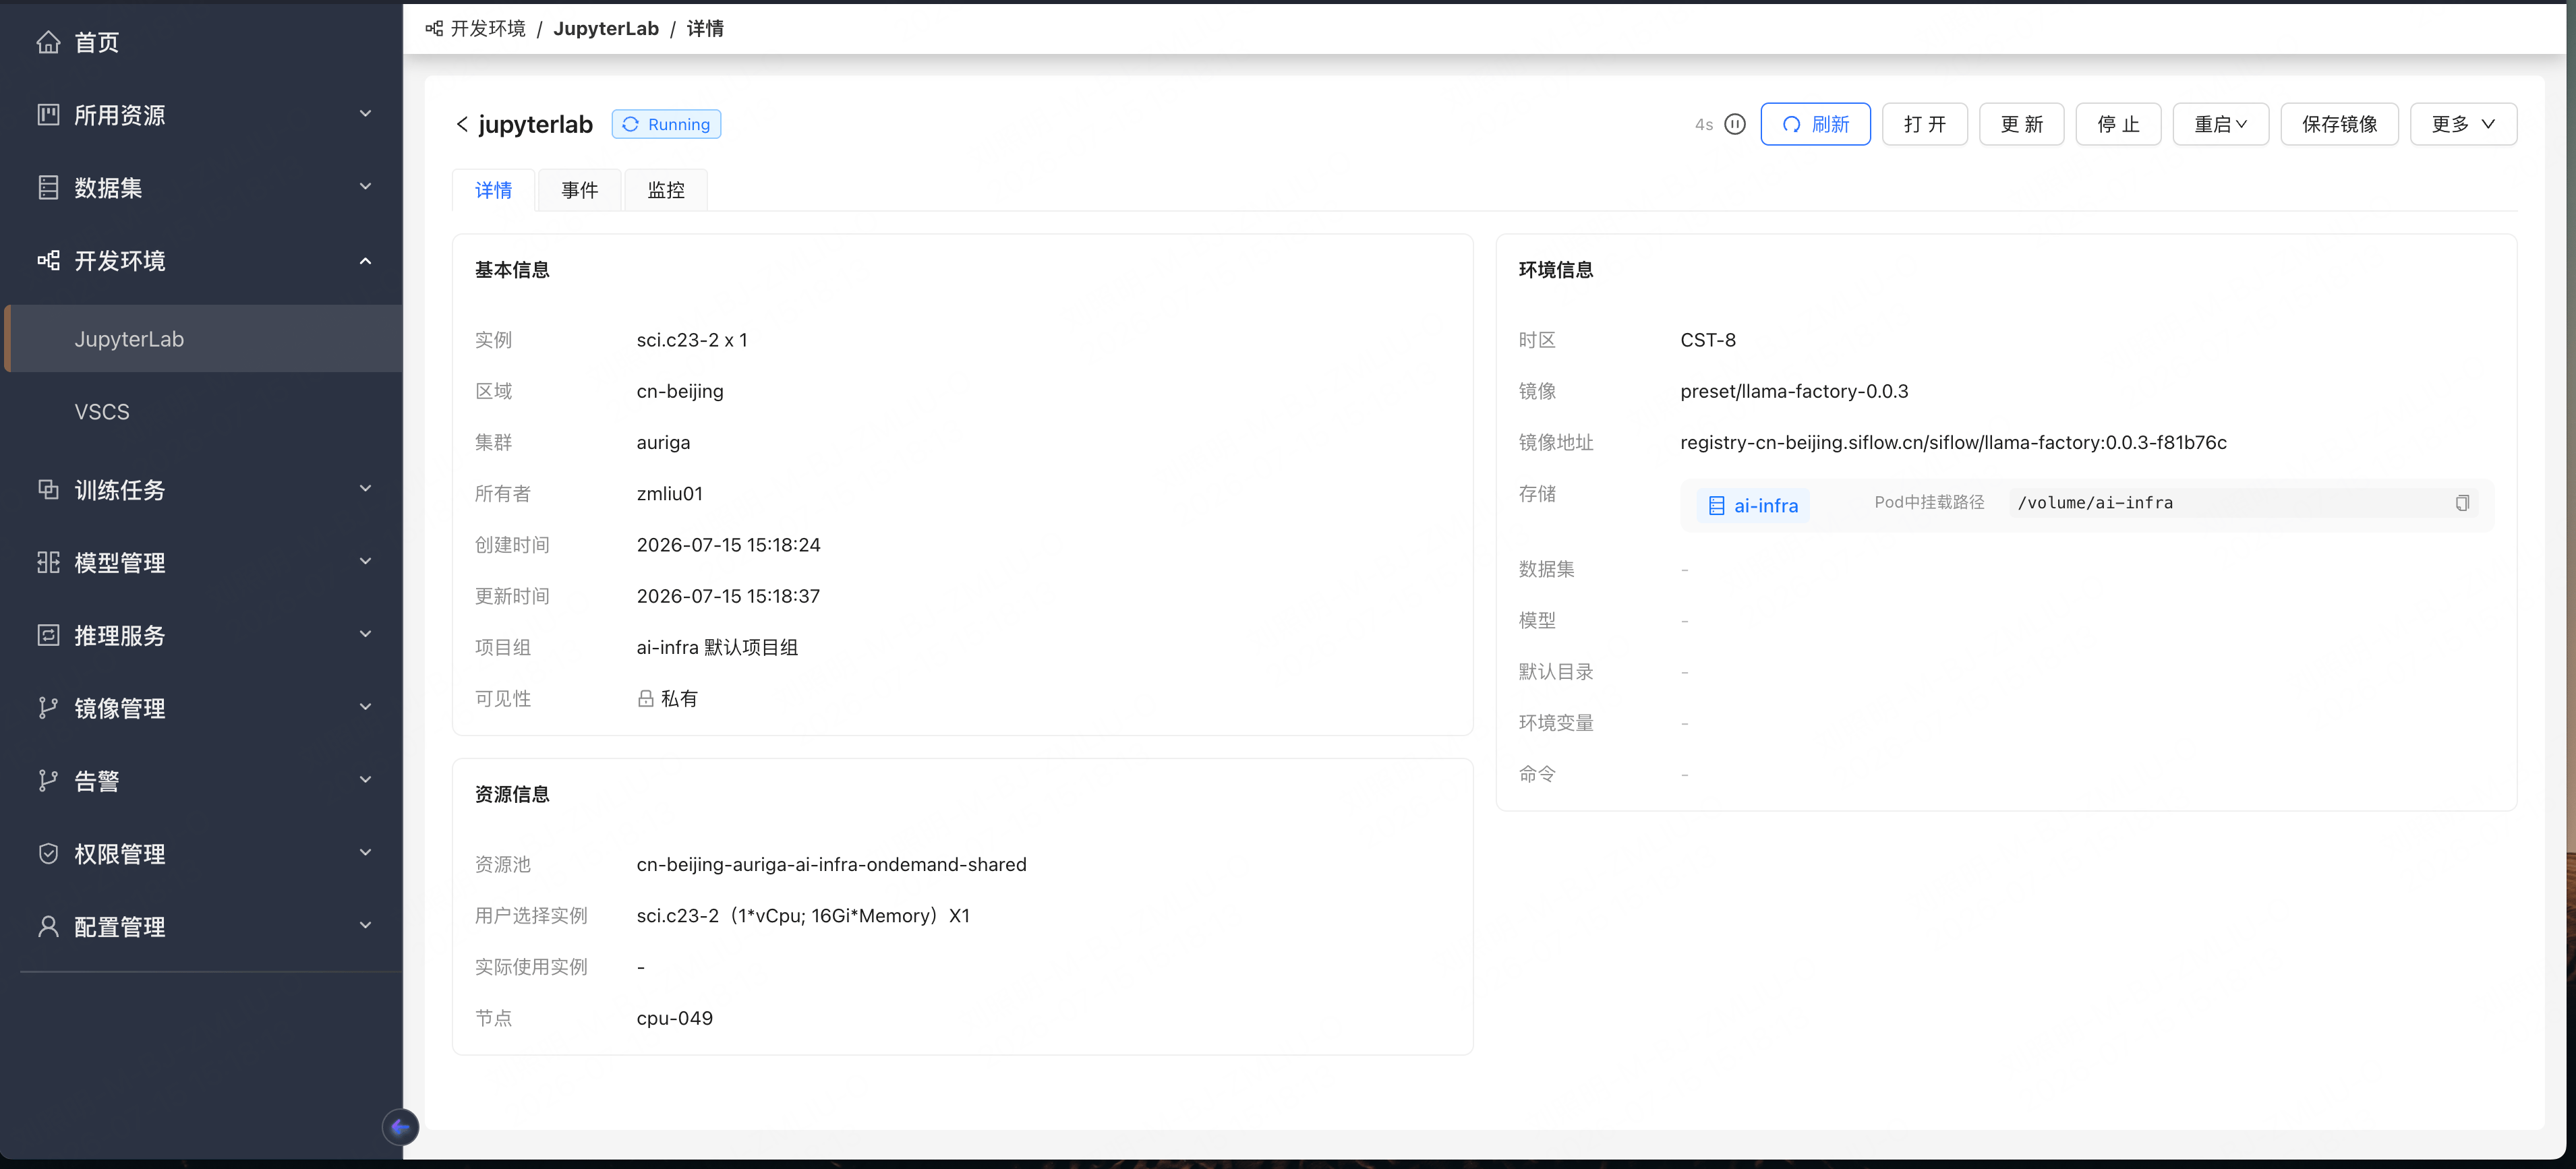 3. 更新:修改 Jupyter 信息,包括镜像、存储卷、挂载目录、实例、根目录和命令。请注意,区域、集群和名称无法修改。
更新页面可以直接从详情页面的右下角进入。
3. 更新:修改 Jupyter 信息,包括镜像、存储卷、挂载目录、实例、根目录和命令。请注意,区域、集群和名称无法修改。
更新页面可以直接从详情页面的右下角进入。
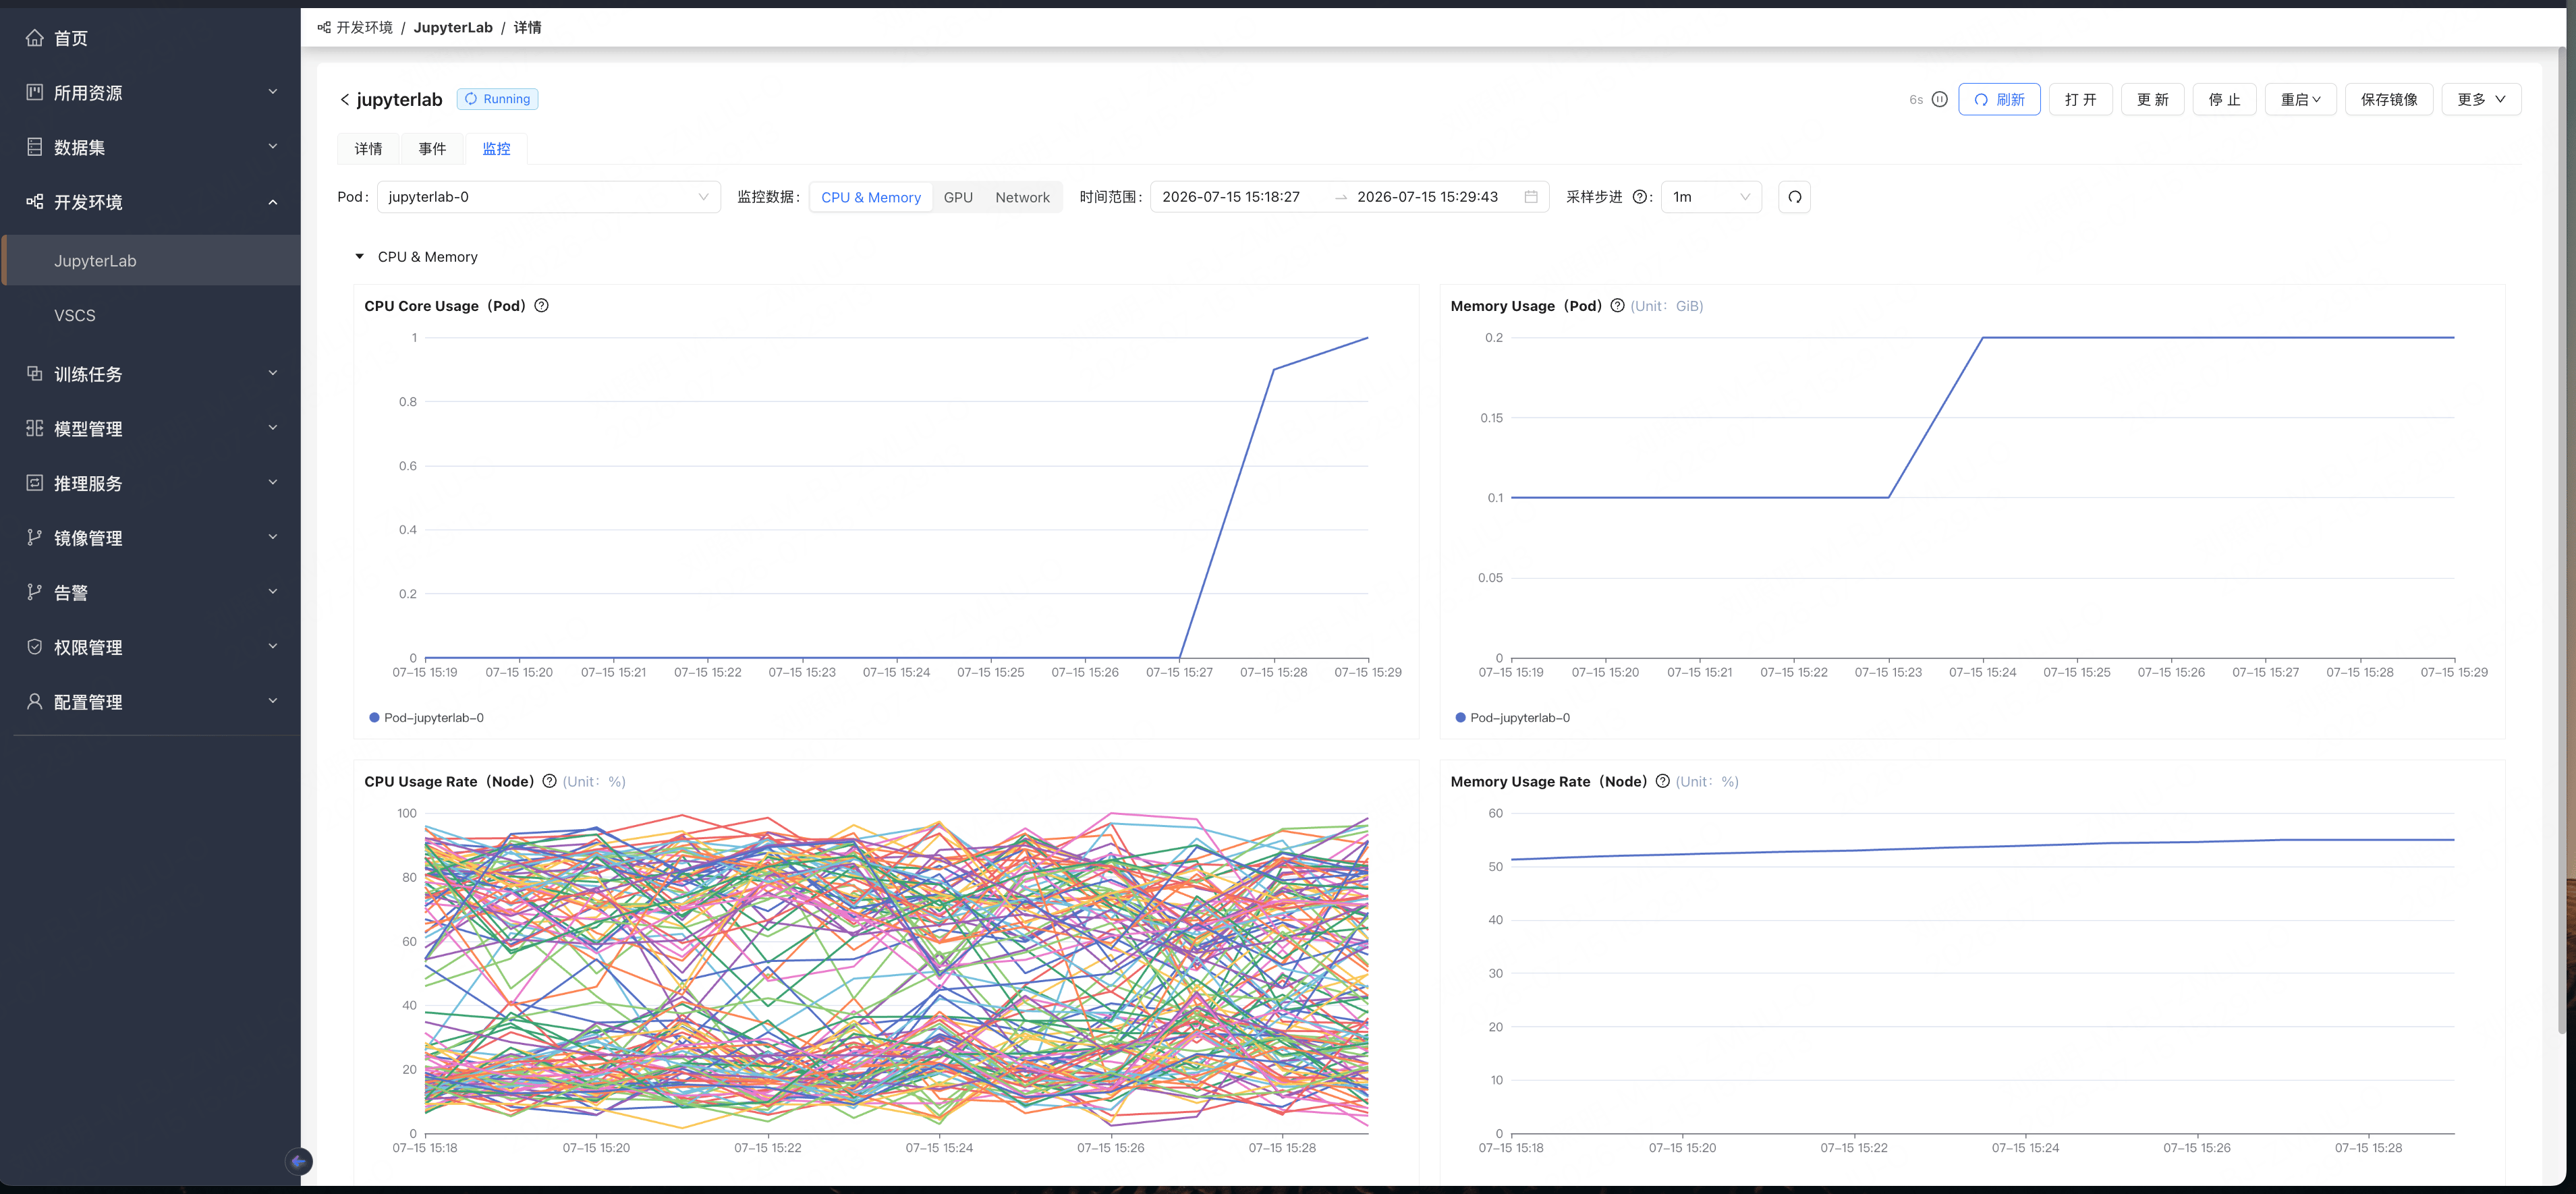
 4. 监控:您可以查看对应 Jupyter pod 的资源使用监控。
 5. 重启:重启分为两种情况:
* 重调度重启:Restarting → Terminating → Scheduling → Pod Initializing → Running
* 原地重启(不重新调度):Restarting → Pod Initializing → Running
5. 重启:重启分为两种情况:
* 重调度重启:Restarting → Terminating → Scheduling → Pod Initializing → Running
* 原地重启(不重新调度):Restarting → Pod Initializing → Running



 6. 停止/启动:关闭/打开 Jupyter(关闭后,Jupyter 对应的资源将被释放,正在运行的程序将停止。请保存重要文件)
点击停止后,Jupyter 状态将变为 Stopped,此时可以点击启动按钮;在其他任何时候,页面上都不会出现启动按钮。
点击启动后,对应的 Jupyter 将被重新创建:Starting -> Scheduling -> Pod Initializing -> Running
6. 停止/启动:关闭/打开 Jupyter(关闭后,Jupyter 对应的资源将被释放,正在运行的程序将停止。请保存重要文件)
点击停止后,Jupyter 状态将变为 Stopped,此时可以点击启动按钮;在其他任何时候,页面上都不会出现启动按钮。
点击启动后,对应的 Jupyter 将被重新创建:Starting -> Scheduling -> Pod Initializing -> Running
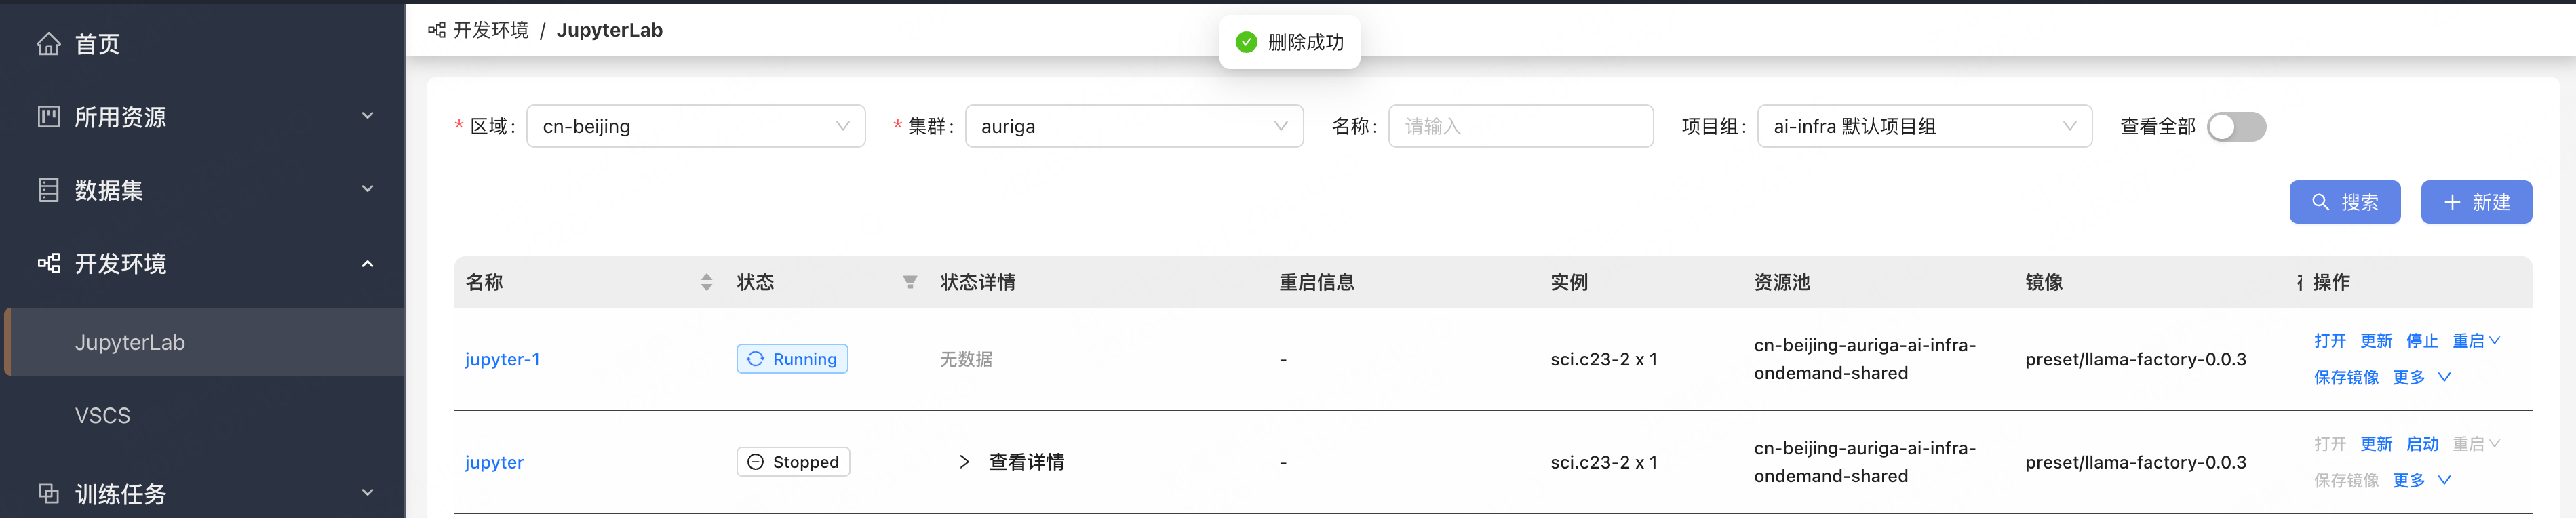
 7. 删除:删除 Jupyter 将使其从概览页面消失,正在使用的资源将被释放。
 ## 状态
状态流转:
* 正常:Queueing → Pending → Scheduling → Pod Initializing → Running
* 停止/重启:Running →(Restarting / Stopping / Terminating)→ Stopped → Deleted
* 异常:Error
各状态说明:
* Queueing(排队中):当您点击创建(或启动)时,实例被放入提交队列、尚未处理,此时处于 Queueing 状态。
* Error(错误):在提交队列中会校验所选资源是否充足;若资源配额不足或排队提交存在其他问题,则进入 Error 状态。
* Pending(等待调度):队列处理完成后,平台创建对应的 Kubernetes 工作负载;它首先等待被调度到某个节点,此时为 Pending 状态。
* Scheduling(调度中):调度器正在为该实例选择并绑定节点,是 Pending 的细化阶段。
* Pod Initializing(Pod 初始化中):镜像就绪后,Pod 正在创建与初始化(含容器创建、卷挂载等)。若卷挂载失败会显示 Volume Mount Error,环境依赖不完整会显示 Incomplete Environment;具体原因可在状态详情中查看。
* Running(运行中):工作负载创建成功、Pod 正常运行,此时可打开 Jupyter Lab / VS Code 或通过 SSH 访问。
* Restarting(重启中):正在执行重启(重调度重启会重新调度、可能换节点;原地重启仅重建容器)。
* Stopping / Terminating(停止中):正在停止并终止工作负载;执行停止或重启,或资源异常时会经过此状态。
* Stopped(已停止):点击停止后,工作负载及其占用资源(如 GPU)被释放,挂载的存储卷保留;需要时可再次启动。
* Deleted(已删除):实例被删除,占用资源释放,并从列表中移除。
## 状态
状态流转:
* 正常:Queueing → Pending → Scheduling → Pod Initializing → Running
* 停止/重启:Running →(Restarting / Stopping / Terminating)→ Stopped → Deleted
* 异常:Error
各状态说明:
* Queueing(排队中):当您点击创建(或启动)时,实例被放入提交队列、尚未处理,此时处于 Queueing 状态。
* Error(错误):在提交队列中会校验所选资源是否充足;若资源配额不足或排队提交存在其他问题,则进入 Error 状态。
* Pending(等待调度):队列处理完成后,平台创建对应的 Kubernetes 工作负载;它首先等待被调度到某个节点,此时为 Pending 状态。
* Scheduling(调度中):调度器正在为该实例选择并绑定节点,是 Pending 的细化阶段。
* Pod Initializing(Pod 初始化中):镜像就绪后,Pod 正在创建与初始化(含容器创建、卷挂载等)。若卷挂载失败会显示 Volume Mount Error,环境依赖不完整会显示 Incomplete Environment;具体原因可在状态详情中查看。
* Running(运行中):工作负载创建成功、Pod 正常运行,此时可打开 Jupyter Lab / VS Code 或通过 SSH 访问。
* Restarting(重启中):正在执行重启(重调度重启会重新调度、可能换节点;原地重启仅重建容器)。
* Stopping / Terminating(停止中):正在停止并终止工作负载;执行停止或重启,或资源异常时会经过此状态。
* Stopped(已停止):点击停止后,工作负载及其占用资源(如 GPU)被释放,挂载的存储卷保留;需要时可再次启动。
* Deleted(已删除):实例被删除,占用资源释放,并从列表中移除。